Ruby retry/scheduled tasks with Dead Letter Exchange in RabbitMQ

There is a project where I need outgoing requests rate limiting. This is the opposite case for the more common situation when you develop API and rate limit clients incoming requests.
With outgoing requests, you need to queue them and give a slot only for some. We’re collecting analytics for web pages. As we collect data only from public sources, we try not to be banned by firewalls or DDoS protection services. Making 1 request per second for content sites is more than enough, as there is no need for speed.
RabbitMQ Cluster is part of our infrastructure and the default queuing solution. Unfortunately, RabbitMQ doesn’t come with native support for delayed or scheduled messages. Fortunately, RabbitMQ has Dead Letter Exchanges (DLX), which allows us to simulate message scheduling.
I’m going to explain how it works and what do we need to build.
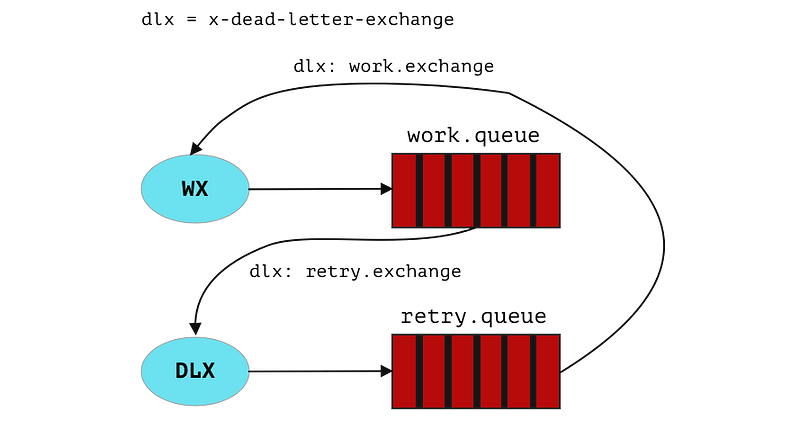
When you create a queue (Q1) bound to exchange (X), you can also specify the Dead Letter Exchange (DLX) to route rejected messages. This process is automatically handled by RMQ. Another queue (Q2) bound to DLX to consume the messages after they’ve been rejected from original (Q1).
And to deliver messages automatically back we can set original exchange as dead letter exchange to the (Q2).
Look at the image.
Sounds a little bit complex, but it’s cool that we need only 1 consumer, all other stuff will be handled by RabbitMQ.
How to?
- Create TargetQueue bound to TargetExchange:
– set Dead Letter Exchange to RetryExchange - Create RetryQueue bound to RetryExchange:
– set Dead Letter Exchange to TargetExchange
– set Message Time To Live (TTL) to the desired time (1 minute for example)
Steps to test the solution:
- Publish message to TargetQueue
- Consumer gets the message and tries to process it
- Process fails, consumer rejects the message
- Rabbit routes the message with the same routing key to RetryExchange
- Message moves to RetryQueue, sits for 90 seconds
- When message expires, it is resent to TargetExchange and routed to TargetQueue
Let’s proceed to code
In Ruby, there are two popular solutions for RabbitMQ. Bunny and Sneakers, which is a really nice abstraction for Bunny. For this post, I choose Bunny as it can show some low-level operations. For my next post, where the whole project is going to be described, I’ll show the “Sneakers” way.
As always, the final solution can be found in my repository on GitHub.
Create a Gemfile and install all necessary stuff.
source 'https://rubygems.org'

gem 'bunny'
gem 'redis'Create publisher, it only publishes a message with routing key to an exchange.
#!/usr/bin/env ruby
# encoding utf-8

require 'bunny'
require 'json'
STDOUT.sync = true

conn = Bunny.new(host: 'rmq', user: 'guest', pass: 'guest')
conn.start

ch = conn.create_channel
x = ch.exchange('work.exchange')

(1..10).each do |i|
  x.publish(
      {id: i, text: "I'm message #{i}"}.to_json,
      routing_key: 'work.queue',
      headers: {
        content_type: 'application/json'
      }
    )
end
conn.closeCreate consumer, it will get messages, process them, try to get the slot for the request and whet it fails, reject them.
#!/usr/bin/env ruby
# encoding utf-8

require 'bunny'
require 'logger'
require 'redis'

logger = Logger.new(STDOUT)
STDOUT.sync = true

conn = Bunny.new(host: 'rmq', user: 'guest', pass: 'guest')
conn.start

ch = conn.create_channel
q = ch.queue('work.queue', arguments: { :'x-dead-letter-exchange' => 'retry.exchange' })

Redis.current = Redis.new(host: 'redis')

# `block: true` is only for presentation purposes
# it blocks the main thread, do not use it in production
q.subscribe(manual_ack: true, block: true) do |delivery_info, properties, payload|
  logger.info "Message received with payload: #{payload}"
  key = "slot:#{Time.now.utc.sec}"
  slot = Redis.current.get(key)
  logger.info "Slot value: #{slot}"
  if !slot || slot.to_i < 1
    logger.info "Slot acquired, writing to Redis"
    result = Redis.current.multi do |multi|
      multi.set(key, 1)
      multi.expire(key, 1)
    end
    logger.info "Slot acquired, finished writing to Redis with result: #{result}"
    ch.ack(delivery_info.delivery_tag)
    logger.info "Message acked"
  else
    # reject without requeue
    ch.reject(delivery_info.delivery_tag)
    logger.info "Message rejected"
  end
end

conn.closeCreate the starting point for our applications. We create exchanges and queues in it.
#!/usr/bin/env ruby
# encoding utf-8

require 'bunny'

STDOUT.sync = true

conn = Bunny.new(host: 'rmq', user: 'guest', pass: 'guest')
conn.start

ch = conn.create_channel
x = ch.direct('work.exchange')
dlx = ch.direct('retry.exchange')

target_queue = ch.queue('work.queue', arguments: {
  :'x-dead-letter-exchange' => 'retry.exchange'
}).bind(x, routing_key: 'work.queue')

retry_queue = ch.queue('retry.queue', arguments: {
  :'x-dead-letter-exchange' => 'work.exchange',
  :'x-message-ttl' => 60000
}).bind(dlx, routing_key: 'work.queue')

conn.closeFor rate-limiting, I prefer Redis way. It is one of the most popular solutions for in-memory databases. I think a lot of ruby projects use Sidekiq, so you definitely have Redis at your infrastructure. It can be tricky to develop a rate-limiting without Redis or Memcached, but still, there is a way. If you feel strong and enjoy inventing the bicycles, code it by yourself. For example — Token buckets.
App in action
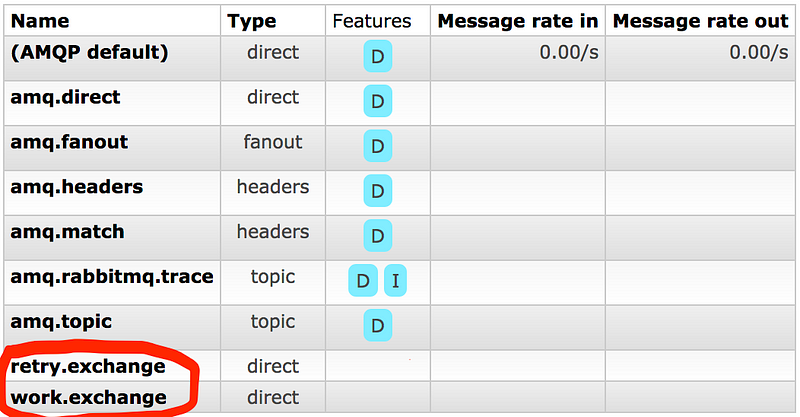
docker-compose run app ./startTake a look at RabbitMQ management page. It is available at http://localhost:8080.

docker-compose run app ./publisher
As we can see all messages are published, but as there are no consumers, all they sit in a queue.
docker-compose run app ./consumer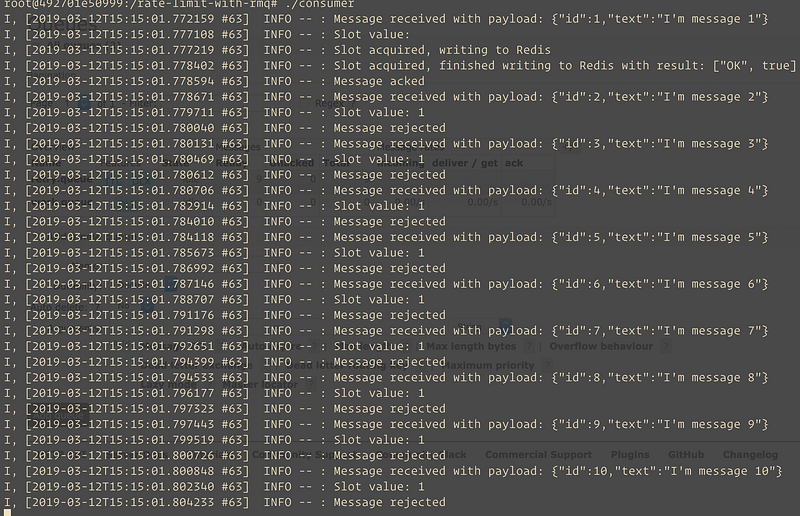

Wait for 60 seconds and look at the terminal.
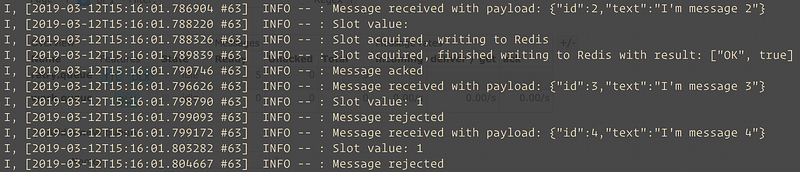
The messages are returned back to the work.queue , once again, only 1 message is processed as there are no slot for others, and they are pushed back to retry.queue by Rabbit.
If you grabbed the code from the repo, read the README and started Docker containers, then you can visit http://localhost:8080 and enjoy watching how messages are processed and requeued by yourself.
Notes on DLX & TTL
There are several ways how you can set a DLX and TTL.
DLX:
- When declaring a queue.
- With RabbitMQ policies.
TTL:
- When declaring a queue
- With RabbitMQ policies
- On a per-message basis
Pros & cons
When you declare a queue, the only way to change options is to stop all the consumers and publishers, drop the queue and redefine it from the ground. It’s not that good, as you don’t know how can publish to it. But all configuration can be done via code.
When you create policies, you can change the policy at any time and no app redeployment will be needed. On the other hand, you must grant people permission to create policies, which is dangerous. Another option is to ask system administrators or operations team to change the policy, which can be a little bit annoying for them.
TTL can be added with an expiration header to message. When a message expires and gets to the head of the queue, it is automatically routed to DLX by RabbitMQ.
Feel free to ask questions in comments or connect directly on twitter.