How to setup Ruby Object Mapper (ROM) for standalone project

I’ve been looking at Data Mapper project for a long time. It transformed into Ruby Object Mapper and when I came up with a simple standalone project for collection post analytics, I decided to use it.

Official ROM documentation is a great place to start, but there is a lack of information on some basic setup. That’s why I thought that my experience will be useful for those who just came from Active Record and looking for first steps.
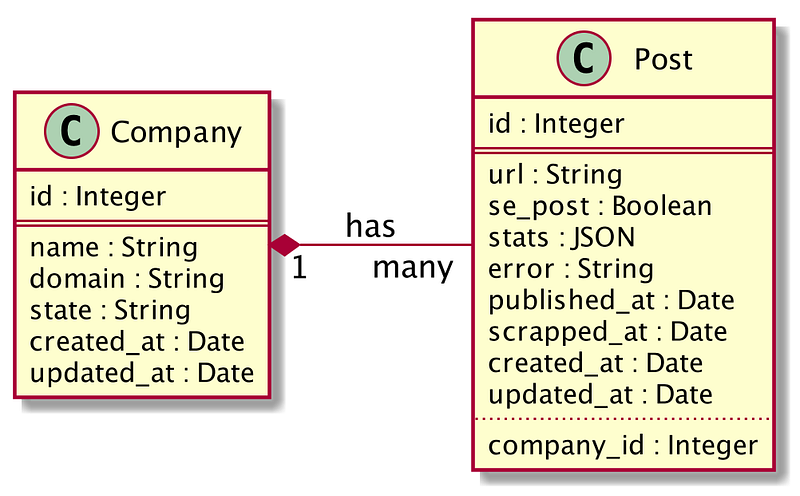
We’re going to build a simple application that starts Pry as a console. There will be 2 entities — Company and Post. You can check the rom-sample-app for the full code example on GitHub.
Project setup
mkdir rom-sample-app && cd rom-sample-app
touch Gemfile
source 'https://rubygems.org'
gem 'rom'
gem 'rom-sql'
gem 'rake'
gem 'mysql2'
gem "awesome_print", require:"ap"
gem 'pry'bundle installCreate boot.rb and require project dependencies.
ENV['RACK_ENV'] ||= 'development'
APP_ROOT = File.expand_path('../', __FILE__)
ENV['BUNDLE_GEMFILE'] ||= File.join(APP_ROOT, '/', 'Gemfile')
require 'bundler'
Bundler.require(:default, ENV['RACK_ENV'].to_sym)Create console.
touch console
chmod +x console
#!/usr/bin/env ruby
require_relative 'boot'
Pry.startNow we can get Pry console by calling $ ./console . Next we must connect to DB and create our entities.
Working with MySQL from ROM

Prepare ROM::Configuration to connect app to MySQL database.
ROM uses Sequel API and we have to count with it. Rails provide default Rake tasks for creating and deleting the DB, ROM doesn’t. I won’t describe the process of creating and deleting the database as it is necessary only 1 time in production environment. Most of the time this process involve DevOps engineers or system administrators and developers only grab the config. I suppose you can create the database for development and test environments on your own.
#!/usr/bin/env ruby
require_relative 'boot'

db_config = {
  name: 'rom_app_development',
  host: 'db',
  user: 'root',
  password: '',
  port: 3306,
  encoding: 'utf8mb4'
}
configuration = ROM::Configuration.new("mysql2:///#{db_config[:name]}", db_config)
MAIN_CONTAINER = ROM.container(configuration)

Pry.start
You shouldn’t work with config like this in production environment. Read from separate file or env variables instead. But for the prototyping purposes it’s more than enough.
Now we have MySQL server, created database and in console we can work with MAIN_CONTAINER object. Calling ROM.container will finalize the process of configuring ROM and all the hooks and callbacks will be invoked. So if you need something to register or configure please do it before calling container method.
Working with ROM migrations

The SQL adapter uses Sequel migration API exposed by SQL gateways. You can either use the built-in rake tasks, or handle migrations manually. To load migration tasks simply require them and provide db:setup task which sets up ROM.
require_relative 'boot'
require 'rom/sql/rake_task'

namespace :db do
  task :setup do
    configuration = ROM::Configuration.new(:sql, "mysql2:///#{CONFIG['db']['name']}", CONFIG['db'])
    ROM::SQL::RakeSupport.env = configuration
  end
end
Create migrations for Company and Post.
bundle exec rake db:create_migration[create_companies]
bundle exec rake db:create_migration[create_posts]
Now there are 2 files in db/migrate directory. Migration names are prepended by timestamps. Timestamp migrations are created by default, but there is other setup where you can use just integers. More on that in official docs.
I used ROM in real project, so I’m going to put here the schema and explain why I needed these fields in other publication.
ROM::SQL.migration do
  change do
    create_table :companies do
      primary_key :id
      column :name, String, null: false
      column :domain, String, null: false
      column :state, String, null: false, default: 'running'
      column :created_at, DateTime
      column :updated_at, DateTime
    end
  end
endROM::SQL.migration do
change do
create_table :posts do
primary_key :id
column :url, String, unique: true, null: false
column :se_post, :boolean, null: false, default: false
column :published_at, DateTime
column :scrapped_at, DateTime, null: false
column :error, String
column :stats, JSON
column :created_at, DateTime
column :updated_at, DateTime
foreign_key :company_id, :companies
end
end
endRun migrations and check that schema exists. On bundle exec rake db:migrate there will be a check for pending migrations. We don’t have any abstractions to work with data, just gateway connection for now.
bundle exec rake db:migrate
  <= db:migrate executed$ ./console
pry(main)> MAIN_CONTAINER.
  gateways[:default].connection.schema(:companies)
=> [[:id,
  {:primary_key=>true,
   :auto_increment=>true,
   :generated=>false,
...
 [:updated_at, {:primary_key=>false, :generated=>false, :allow_null=>true, :default=>nil, :db_type=>"datetime", :type=>:datetime, :ruby_default=>nil}]]
ROM Relations
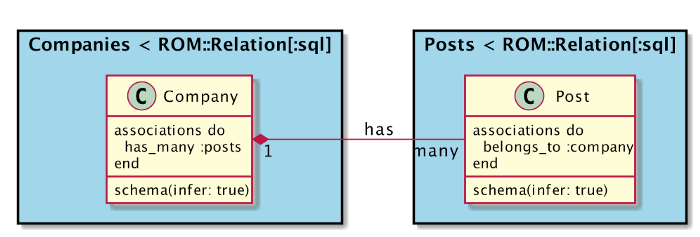
Users of ROM implement Relations, which give access to data. A relation is defined as a set of tuples identified by unique pairs of attributes and their values. An example of relations is tables in a SQL server. Relations are really the heart of ROM. They provide APIs for reading the data from various databases, and low-level interfaces for making changes in the databases.
Let’s create Post & Company relations in lib/relations/ directory.
class Companies < ROM::Relation[:sql]
  schema(:companies, infer: true) do
    associations do
      has_many :posts
    end
  end
endclass Posts < ROM::Relation[:sql]
schema(:posts, infer: true) do
attribute :stats, Types::Coercible::JSON
associations do
belongs_to :company
end
end
def by_url(url)
where(url: url).to_a
end
endAs ROM uses dependency injection throughout the lib, we must register our components. More on that in official docs.
configuration.register_relation(Companies, Posts)We put this code into console file. When your app grows, you would definitely move it to a special place like initializer or smth similar. But for demonstration purposes it’s more than enough to put it near the app running code.
Now we can access relations from MAIN_CONTAINER, like:
pry(main)> MAIN_CONTAINER.relations[:companies].count
=> 0
pry(main)> MAIN_CONTAINER.relations[:posts].count
=> 0
Let’s go further with ROM Commands. We want not only querying the data, but add or update some.

Commands are used to make changes in your data. Every adapter provides its own command specializations, that can use database-specific features.
Core commands include following types:
:create- a command which inserts new tuples:update- a command which updates existing tuples:delete- a command which deletes existing tuples
We are going to create commands for Posts and Companies and put them into lib/commands/.
class CreateCompany < ROM::Commands::Create[:sql]
  relation :companies
  register_as :create
  result :one

  use :timestamps
  timestamp :created_at, :updated_at
endclass CreatePost < ROM::Commands::Create[:sql]
relation :posts
register_as :create
result :one
use :timestamps
timestamp :scrapped_at, :created_at, :updated_at
endclass DeleteCompany < ROM::Commands::Delete[:sql]
relation :companies
register_as :delete
endclass DeletePost < ROM::Commands::Delete[:sql]
relation :posts
register_as :delete
endclass UpdatePost < ROM::Commands::Update[:sql]
relation :posts
register_as :update
use :timestamps
timestamp :updated_at
end Note the lines
use timestamps
timestamp :created_at, :updated_at
This how we use Timestamps plugin to automatically set the dates like Active Record does.
Now we must register our commands:
configuration.register_command(CreateCompany, DeleteCompany)
configuration.register_command(CreatePost, UpdatePost, DeletePost)
Let’s create the 1st company:
[1] pry(main)> companies = MAIN_CONTAINER.relations[:companies]
[2] pry(main)> companies.command(:create).call(
       name: 'My 1st Company', domain: 'http://example.com')
=> {:id=>1,
 :name=>"My 1st Company",
 :domain=>"http://example.com",
 :state=>"running",
 :created_at=>2019-03-09 14:24:23 +0000,
 :updated_at=>2019-03-09 14:24:23 +0000}
That’s it. id and state were assigned automatically, timestamps creation was also handled by ROM.
Testing with ROM
The question then arises, “How should I test this stuff?..”. We’re going to use RSpec with ROM factory. It’s kind of replacement for factory_bot gem by Thoughbot.
It’s time to add settings.yml to project and put config there. Also we need to add rspec dependency to Gemfile and create test database. View the commits to the repo: 1, 2.
Define factories
let(:factories) do
  ROM::Factory.configure do |config|
    config.rom = MAIN_CONTAINER
  end
end

before do
  factories.define(:post) do |f|
    f.url { fake(:internet, :url, 'example.com') }
    f.se_post false
    f.stats {}
    f.association(:company)
  end
  factories.define(:company) do |f|
    f.sequence(:name) {|n| "Company Name #{n}"}
    f.domain { "https://#{fake(:internet, :domain_name)}" }
    f.state "running"
  end
  factories.define(with_post: :company) do |f|
    f.association(:posts, count: 1)
  end
endCheck company_spec.rb in repository for simple test of creating company with 1 post.
This is it. We created a standalone console application with Ruby Object Mapper. Additional info on running app in docker container is in README.
If you have any questions, write a comment or connect directly on twitter.