Managing Unicorn & Puma web servers with systemd
In production environment, you have to deal with service crashes and auto restarts, and there are plenty of tools to that end— supervisord, monit etc. Having lots of projects, we try to use standard utilities that come with distros, Ubuntu in our case.
Standard Ubuntu init system is Systemd, definitely one of the most famous and widely used tools. It’s a security standard to run apps under non-privileged users, and systemd offers a solution in this case.

Our initial setup is Ruby via RVM and Unicorn/Puma running simple Rack application.
Important notice, I don't provide Docker files with examples as systemd won't succeed in a non-privileged mode in Docker, so I advise you to test this in a separate virtual machine. You can find more on this case on askubuntu and Docker docs. For macOS, you can use LXD or multipass to spin up Ubuntu VM. LXD setup can be tricky, so for this project, I've prepared a cloud-init file that can be used as a multipass entrypoint.
packages:
  - build-essential
  - bison
  - libreadline6
  - libreadline6-dev
  - curl
  - git-core
  - zlib1g-dev
  - libssl-dev
  - libyaml-dev
  - libsqlite3-dev
  - sqlite3
  - libxml2-dev
  - libxslt-dev
  - autoconf
  - ncurses-dev

runcmd:
  - gpg --keyserver hkp://pool.sks-keyservers.net --recv-keys 409B6B1796C275462A1703113804BB82D39DC0E3 7D2BAF1CF37B13E2069D6956105BD0E739499BDB
  - '\curl -sSL https://get.rvm.io | bash -s stable --ruby=ruby-2.5.3 --gems=bundler'
  - mkdir /apps
  - useradd -d /apps/awesomeapp -m -s /bin/bash -G rvm awesomeapp
view raw
multipass launch -n sysd -c 1 -m 2g --cloud-init init.yml xenialBased on Xenial, because we made an infrastructure upgrade from 12.04 to 16.04 LTS in 2017, so it’s our standard for this & next year.

Assume we have a non-privileged user awesomeapp with home directory /apps/awesomeapp and shell /bin/bash. App root /apps/awesomeapp/awesomeapp-git.
Let’s prepare the directory structure for systemd files:
mkdir -p /apps/awesomeapp/.config/systemd/userCreate unicorn.service . All files for the application can be found at sample repo on my Github.
[Unit]
Description=Unicorn service
After=network.target

[Service]
Type=forking
Environment=RAILS_ENV=production
WorkingDirectory=/apps/awesomeapp/awesomeapp-git

PIDFile=/apps/awesomeapp/awesomeapp-git/tmp/pids/unicorn.pid
ExecStart=/bin/bash -l -c 'bundle exec unicorn -c config/unicorn.rb -D'
ExecReload=/bin/kill -HUP $MAINPID
KillMode=process
KillSignal=SIGQUIT
Restart=on-failure
SyslogIdentifier=awesomeapp-unicorn

[Install]
WantedBy=default.targetReload systemd daemon:
awesomeapp@sysd:~$ systemctl --user daemon-reload
Failed to connect to bus: No such file or directory
There is a discussion about this error on launchpad. To fix it, just add to /apps/awesomeapp/.profile.
export XDG_RUNTIME_DIR=/run/user/`id -u`After that, from root or your sudo user enable user lingering:
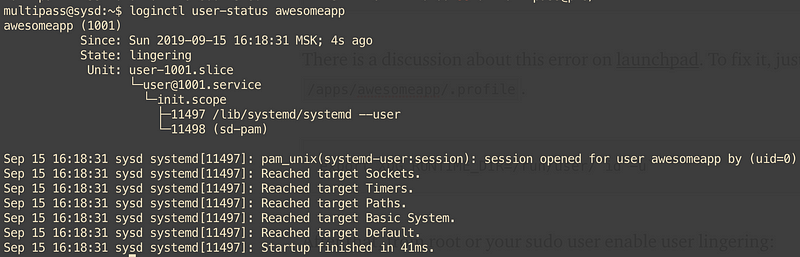
sudo loginctl enable-linger awesomeappcheck that it works:
loginctl user-status awesomeappYou should see smth like this:
Login back to the user and reload the daemon:
sudo -iu awesomeapp
systemctl --user daemon-reload
systemctl command under app user without sudo, it’s not a mistake. App user can use it freely, so, dev team can maintain service files easily without operations team involved.
Check the status:

It’s inactive, not running and disabled. It means that it won’t start up after boot. For example, you have 1..N app machines, and some of them can go down for system upgrades or just because of a crash, so we need the app running after reboot.
systemctl --user enable unicorn
Let’s give it a try:

Unicorn master process and 2 worker process, as we configured.

Let’s do the same for Puma, standard Rails web server. Puma.service file:
[Unit]
Description=Puma service
After=network.target

[Service]
Type=forking
Environment=RAILS_ENV=production
WorkingDirectory=/apps/awesomeapp/awesomeapp-git

PIDFile=/apps/awesomeapp/awesomeapp-git/tmp/pids/puma.pid
ExecStart=/bin/bash -l -c 'bundle exec puma -C config/puma.rb'
ExecStop=/bin/bash -l -c 'bundle exec pumactl -F config/puma.rb stop'
ExecReload=/bin/bash -l -c 'bundle exec pumactl -F config/puma.rb phased-restart'
Restart=on-failure

SyslogIdentifier=awesomeapp-puma

[Install]
WantedBy=default.target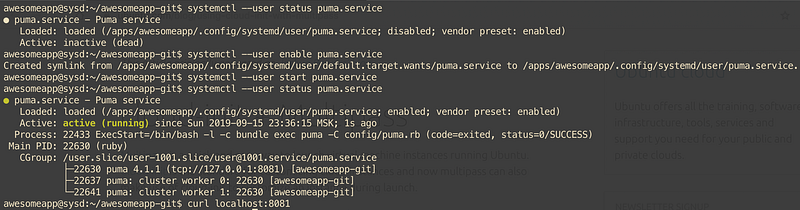
Now you can reboot VM and check that everything up and running.
All commands with comments.
Unicorn:
# check unicorn.service status
systemctl --user status unicorn

# start unicorn.service
systemctl --user start unicorn

# start unicorn.service on VM boot
systemctl --user enable unicorn

# disable starting unicorn.service on VM boot
systemctl --user disable unicorn

# restart unicorn.service
systemctl --user restart unicorn

# graceful restart unicorn.service
systemctl --user reload unicorn

# stop unicorn.service
systemctl --user stop unicorn
Puma:
# check puma.service status
systemctl --user status puma

# start puma.service
systemctl --user start puma

# start puma.service on VM boot
systemctl --user enable puma

# disable starting puma.service on VM boot
systemctl --user disable puma

# restart puma.service
systemctl --user restart puma

# graceful restart puma.service
systemctl --user reload puma

# stop puma.service
systemctl --user stop puma
That’s it for today. Puma and Unicorn configs are for the sample app, for production purposes, you definitely must adopt to needs and load.